Why Your Room Measurements Come Before Everything Else
The most expensive mistake you can make when building a home golf simulator is falling in love with a launch monitor before you have measured your room.

The launch monitor can be returned. The ceiling cannot be raised on a whim. The wall that sits two feet inside your follow-through is not going anywhere. And if you buy a radar-based unit that needs 18 feet of total room depth and your garage is 16 feet deep, you have a very accurate, very useless device.
Space planning is where every successful home simulator build starts — and where most frustration, wasted money, and post-delivery regret originates. The good news is that it takes less than an hour to do it properly. This guide walks you through every dimension that matters, with specific numbers for every scenario, so you can walk into the planning process with confidence rather than guesswork.
The Three Dimensions That Determine Everything
A golf simulator room has three critical measurements, and each one creates a different type of constraint:
Ceiling Height determines whether you can physically swing a full driver without striking anything above you. This is the dimension most homeowners underestimate — and the one that is hardest and most expensive to change after the fact.
Room Width determines how much side clearance you have for your follow-through, whether both right- and left-handed players can use the setup comfortably, and how much buffer sits between a mishit and a finished wall.
Room Depth determines which launch monitor technology will actually work in your space, how far the ball travels from tee to screen, and where the projector can be positioned.
All three interact with each other. A room that is deep enough but too narrow still does not work. A room with perfect height and width that is too shallow for your radar unit is equally problematic. The goal is to confirm all three before committing to any purchase.
Ceiling Height: The Least Forgiving Dimension

The Industry Benchmark: 9–10 Feet
The clearest, most cited standard in the industry comes from Carl's Place, one of the most respected simulator builders in North America: the average golfer needs a 9–10 ft ceiling to golf indoors. Below that number, you will compromise your swing, your club selection, and your safety. Their published guidance notes that while shorter ceilings can technically accommodate a simulator, you will be sacrificing swing space and limiting which clubs you can use — with a driver typically off the table.
That 9–10 ft benchmark is not arbitrary. It reflects the swing mechanics of a typical adult golfer taking a full backswing with a 45–46 inch driver. The club head travels in an arc that peaks well above the hands, and the actual clearance requirement depends on the golfer's height, arm length, and swing plane — not just the club length.
The Height-to-Golfer Relationship
The 9 ft floor applies to golfers under roughly 5'10". As height increases, the arc climbs:
Under 5'10": 9 ft is workable for a full driver swing with a standard 45-inch club
5'10" to 6'2": 9.5 ft is the practical minimum; 10 ft strongly preferred
6'2" to 6'5": 10 ft minimum; 10.5 ft preferred
Over 6'5": 11 ft is the honest requirement for a comfortable, unrestricted swing
These are swing-arc clearances, not comfort preferences. A golfer who is 6'4" swinging a 46-inch driver in a 9 ft room will either flinch at the top of the backswing, modify their swing plane, or clip the ceiling. All three outcomes are bad — the first two degrade your game; the third damages your equipment and potentially you.
What "9 Feet" Actually Means in Your Specific Room
Here is where most homeowners go wrong: they measure ceiling height at the tallest point in the room, not at the actual hitting position.
Basements have ductwork, beams, low-hanging pipes, and drop-tile ceilings that reduce effective clearance. A basement that measures 9 ft to the exposed joists might clear 8'2" below the main HVAC trunk that runs directly over the intended hitting area. That is a fundamentally different space.
Garages have the ceiling at the walls, but the roof peak is often higher. Garage door tracks run parallel to the swing plane and can intrude into the backswing arc even when the ceiling itself is adequate. A track that sits 8'6" off the floor at the side wall can be exactly where your club head is on a full driver backswing from that position.
The only reliable measurement is taken at the exact hitting position, measuring to the lowest overhead obstruction in the swing arc. Everything else is an approximation that can result in a very expensive mistake.
The Practical Test
Before buying anything, take your longest club into the room, stand in your intended hitting position, and make a full, deliberate backswing and follow-through at practice speed. Have someone spot your highest clearance point and mark it with painter's tape. Add 6 to 9 inches above that mark. That is your required ceiling height.
If you cannot clear that number, you have a genuine constraint to work around — and the section on tight spaces below covers your options.
Room Width: The Most Underestimated Dimension

Why Width Is Quietly the Second Most Important Measurement
Width does not announce itself the way ceiling height does. You can stand in a narrow room and think it looks fine, until you take a full swing, follow through, and realize your club finished two feet into the wall you did not notice.
Width affects three things simultaneously: the safety buffer between your follow-through and hard surfaces, whether you can hit from the center of the screen (optimal for the simulator's tracking), and whether both right- and left-handed players can use the same setup without repositioning the entire hitting mat.
Width Benchmarks
Published guidance from Carl's Place sets the comfortable target at 14 feet wide for a well-rounded home setup — one that gives adequate side clearance and supports both handedness without feeling cramped:
10–11 ft: Technical minimum for an offset (non-centered) hitting position. A single right-handed golfer hitting from a position biased to the right side of the screen can make this work, but it feels tight and is not practical for guests or left-handed players.
12–13 ft: Comfortable for a single golfer hitting from center. Meaningful side clearance for the follow-through. The practical floor for most home builds.
14–15 ft: The recommended standard. Supports center hitting, both handedness, and a meaningful buffer between swing arc and finished walls. Carl's Place and most installer guides cite 14 ft as their target for new builds.
16 ft+: Ideal for mixed-handed setups and social rounds. TrackMan specifies approximately 15 ft (4.6 meters) as their minimum width recommendation for their hardware.
The Side-Netting Question
Width planning should also account for side netting. Even in a 14 ft room, a toe shank or a badly mishit ball can send the ball toward the side wall at significant velocity. Side containment netting is not an optional upgrade — it is part of what makes a correctly dimensioned room actually safe to use. If your enclosure does not include side panels, plan for that addition in your width calculation. A room that is 14 ft wide with side nets installed is effectively narrower than a 14 ft room measured wall-to-wall.
Room Depth: How Your Space Dictates Your Launch Monitor
Of the three dimensions, room depth has the most direct consequence on which launch monitor you can buy. This relationship between depth and technology is the most frequently overlooked element of simulator planning, and it produces the most expensive surprises.
The Core Rule
Camera-based (photometric) monitors need less depth. Radar-based monitors need significantly more.
This happens because of how each technology works. Camera systems — like the SkyTrak+, Foresight GC3, and Bushnell Launch Pro — capture ball and club data in the first few inches of ball flight, positioned beside or in front of the ball. They require no clearance behind the golfer, and the ball can be as close as 8–10 feet from the screen and still produce reliable data.
Radar systems — like the Garmin Approach R10/R50, FlightScope Mevo Gen2, and TrackMan — sit behind the golfer and need the ball to travel through the air for several feet before the radar has enough Doppler data to calculate spin, launch angle, and carry reliably. That requires space both behind the golfer and in front to the screen.
Depth Requirements by Technology
Photometric (Camera-Based) Systems:
Ball-to-screen distance: 8–10 ft minimum (10 ft preferred)
No space required behind the golfer (monitor sits beside or in front of ball)
Total minimum room depth: 14–15 ft
Works in tight spaces that would rule out radar
Radar-Based Systems:
Space behind golfer: 6–9 ft depending on unit
Ball-to-screen distance: 8–10 ft minimum
Total minimum room depth: 16–18 ft (18 ft preferred for most units)
The Mevo Gen2 needs approximately 7–9 ft behind the ball position
The Garmin R10/R50 needs approximately 6–8 ft behind the ball
Specific examples from the two most common launch monitors used in home builds:
Garmin R10: Sits on the floor behind the tee. Needs 6–8 ft behind ball, 10 ft ball-to-screen. Total: ~16–18 ft.
SkyTrak+: Sits beside the ball at ground level. Needs 10 ft ball-to-screen, no behind-golfer clearance. Total: ~14 ft.
This is why a camera-based monitor like the SkyTrak+ or Bushnell Launch Pro is the correct choice for tight rooms under 16 ft deep — not because it is necessarily inferior to radar, but because it is physically compatible with the space. A Garmin R10 in a 15-foot room will not produce reliable spin data. A SkyTrak+ in the same room will work perfectly.
The Screen Buffer
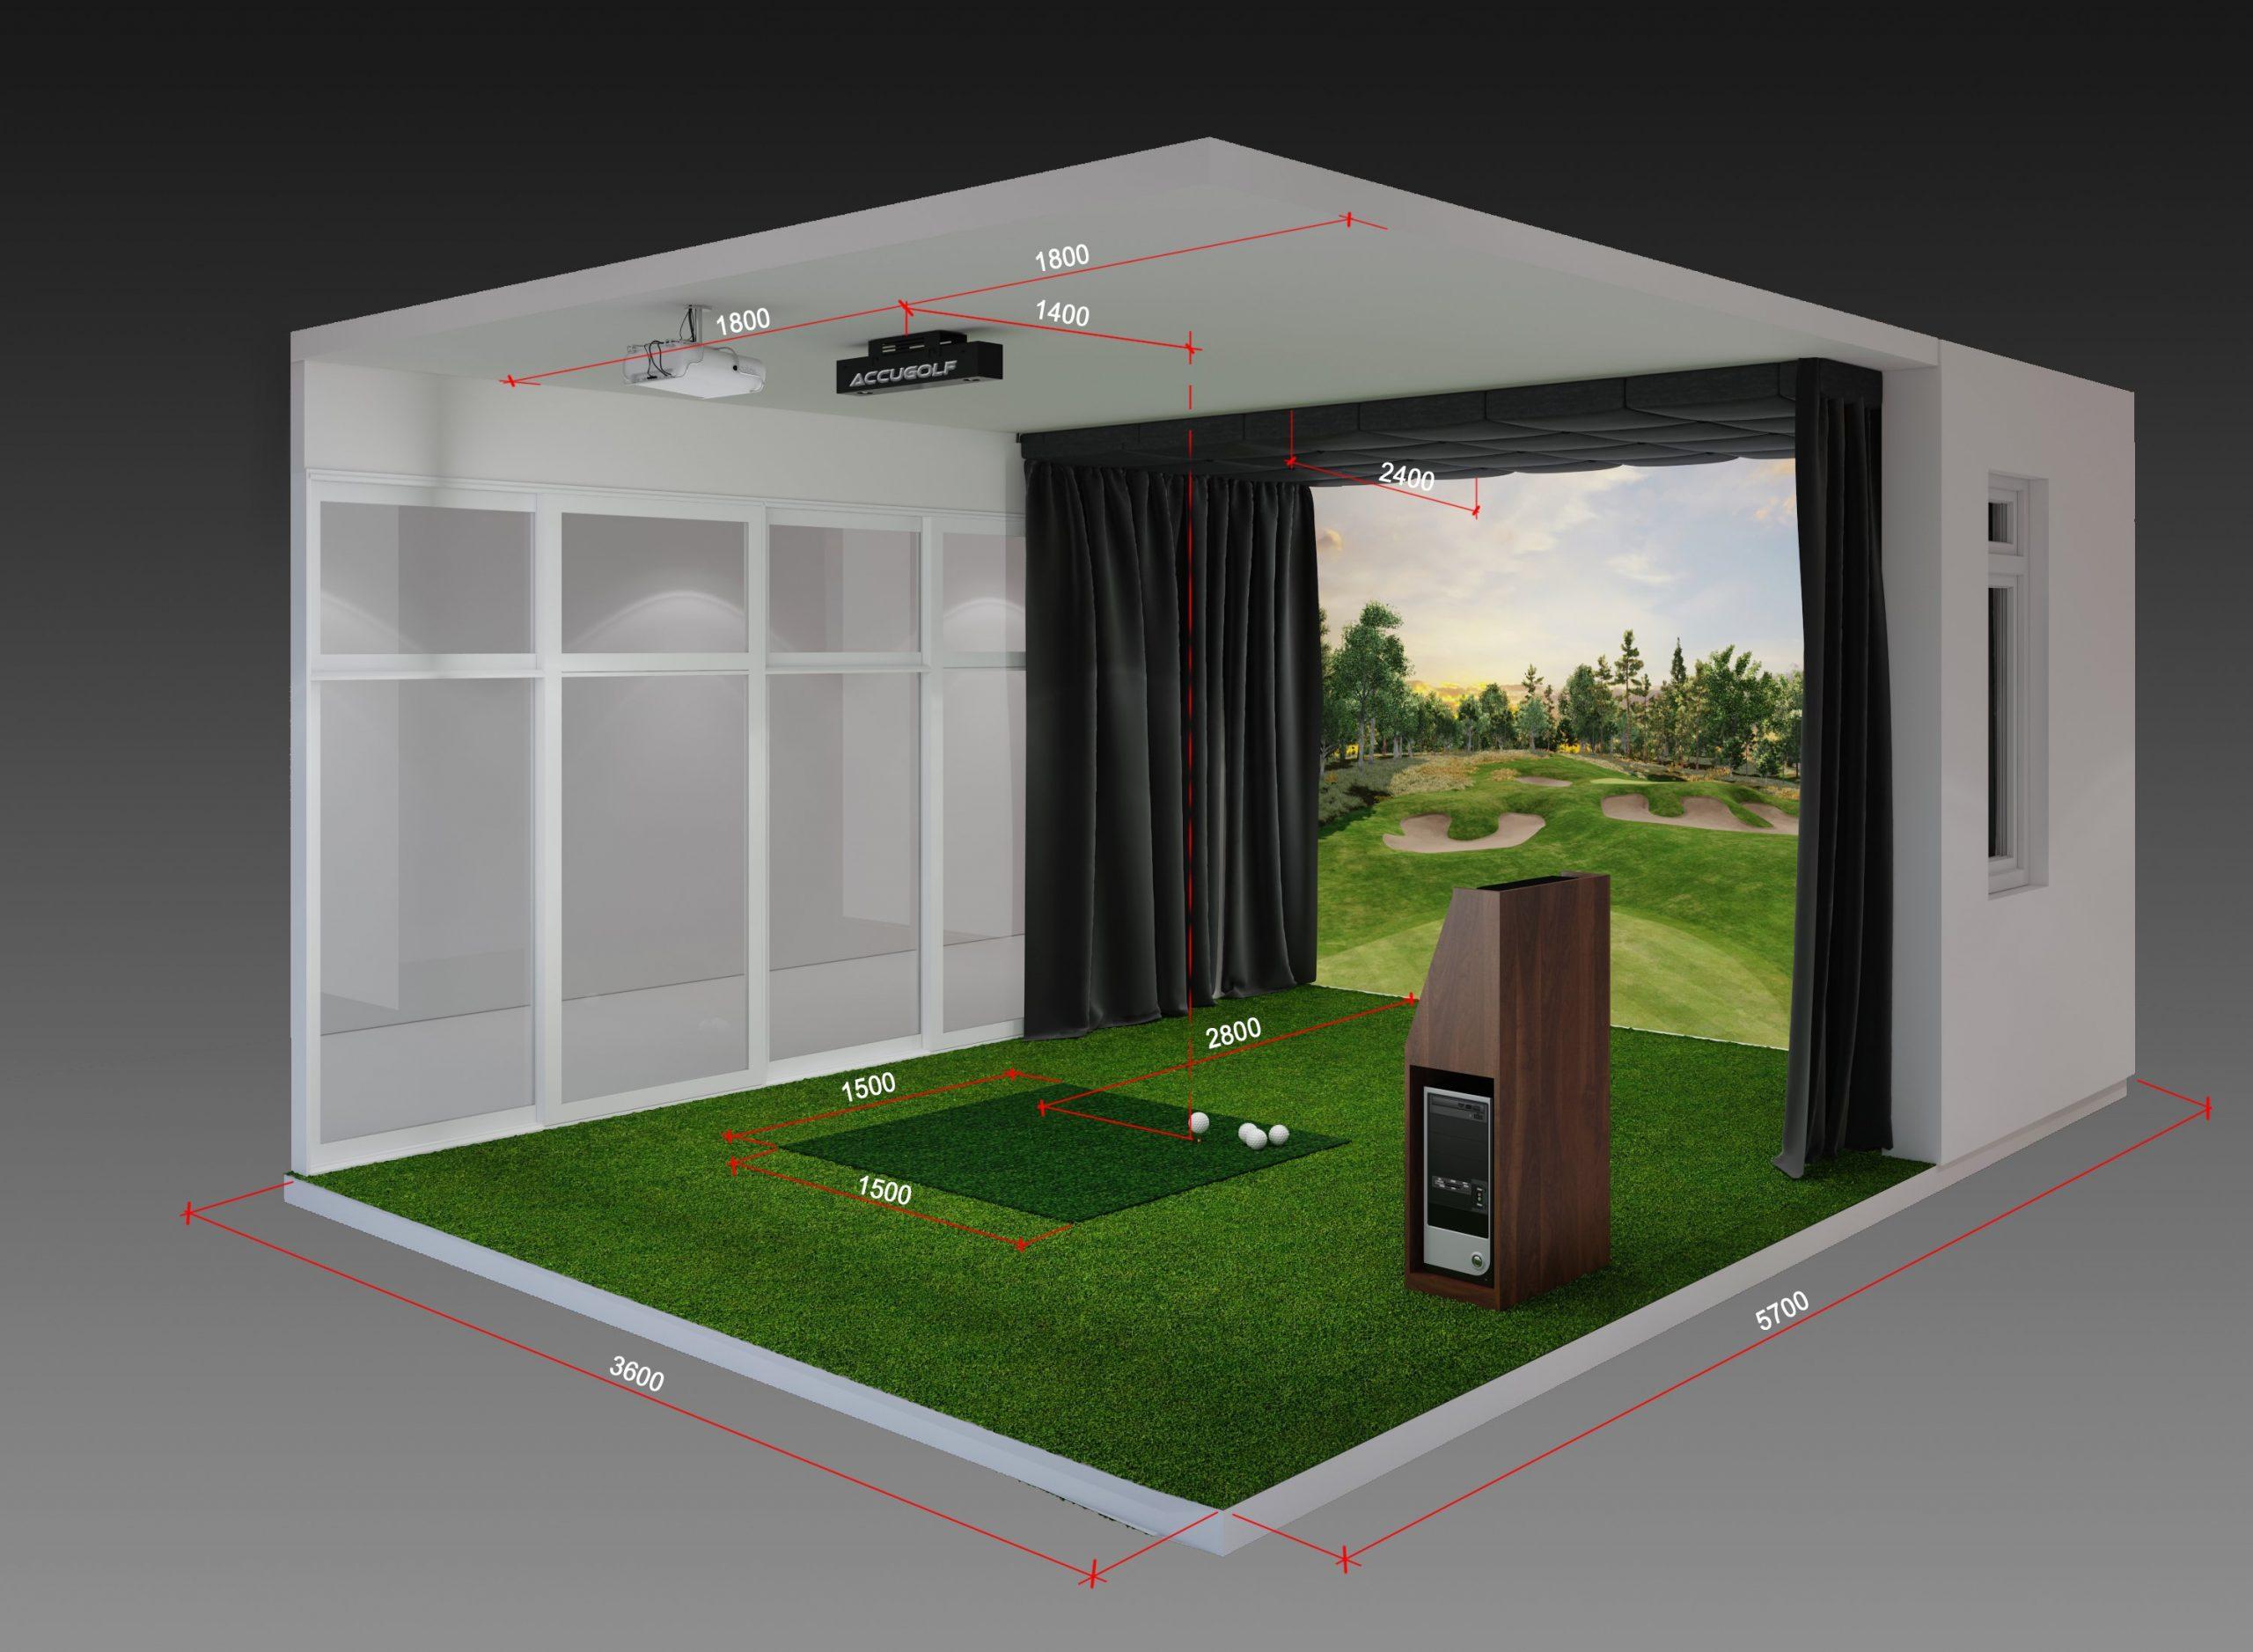
One additional depth factor most planning guides skip: the impact screen cannot sit flush against the back wall. The screen needs 12–18 inches of buffer behind it to allow the fabric to decelerate the ball without bouncing it straight back at the golfer. Enclosure frames and retractable screen systems require additional depth consideration. When calculating your ball-to-screen distance, measure from the hitting mat to where the screen sits — not to the back wall.
Quick-Reference: Minimum vs. Ideal Dimensions
Dimension | Absolute Minimum | Practical Target | Ideal |
|---|---|---|---|
Ceiling Height | 9 ft (under 5'10") | 10 ft | 10.5–11 ft |
Room Width | 10 ft (offset hitting) | 14 ft | 16 ft+ |
Room Depth (camera LM) | 14 ft | 16 ft | 18 ft+ |
Room Depth (radar LM) | 16 ft | 18 ft | 20 ft+ |
Ball to Screen | 8 ft | 10 ft | 12 ft |
Space Behind Golfer | 5 ft (camera) / 6 ft (radar) | 7 ft | 8–10 ft |
Carl's Place comfortable standard: 14 ft wide × 18 ft deep × 10 ft ceiling.
How to Measure Your Space Correctly (Before You Buy Anything)
Bring a tape measure, a notepad, and your longest club. Do not rely on architectural drawings, builder estimates, or eyeballing. Measure the actual room.
Step 1: Measure ceiling height at the hitting position. Stand where you intend to hit from. Measure from the floor to the lowest overhead point directly in your swing arc — not at the room's center or its highest point. Note any beams, ducts, lights, or door tracks that intrude into the arc.
Step 2: Take a physical swing test. Hold your driver at the grip, stand in position, and make a slow full backswing and follow-through. Mark the highest point your club reaches with painter's tape. Add 6–9 inches. That is your clearance requirement.
Step 3: Measure wall-to-wall width at the hitting position. This is the width at the exact point where you stand, not across the room's widest section. Note any wall-mounted objects, shelving, or doorways within the swing arc.
Step 4: Measure total room depth. From the back wall (where you would stand) to the front wall (where the screen goes). Subtract 12–18 inches for screen buffer from the back wall. The remaining distance is your usable depth.
Step 5: Identify all overhead obstructions. Garage door tracks, ceiling fans, light fixtures, low-hanging pipes, HVAC vents, and structural beams. Mark which ones are within the swing zone. These define your effective ceiling height regardless of what the nominal room measurement shows.
Step 6: Note room type and climate. Garages require climate control planning for year-round use. Basements offer natural temperature stability but often have the tightest ceiling constraints. Spare rooms are climate-controlled but typically have the most limited depth.
Space Requirements by Room Type
Two-Car Garage
The most popular location for home golf simulators, and often the most accommodating. A standard two-car garage typically runs 20–24 ft wide, 20–24 ft deep, with 9–10 ft ceilings at the walls (rising higher at the center peak of the roof). That is more than enough for any simulator configuration.

The garage-specific hazards to check: garage door tracks run along the ceiling parallel to the swing plane and can sit exactly where a driver backswing peaks. Stand in your intended hitting position and take a practice swing before assuming the track clearance is fine. The second issue is temperature. Electronics and launch monitor accuracy are both degraded by sustained cold. For year-round use in cold climates, a mini-split or ceiling-mounted electric heater is not optional — it is part of the build cost.
Finished Basement
Excellent natural conditions: stable year-round temperature, near-blackout ambient light, and good sound isolation from the rest of the house. The limiting factor is almost always ceiling height. Standard finished basements land between 8 and 9 ft clear height after accounting for joists, drop tiles, HVAC ducts, and light fixtures. At 8 ft, a full driver swing is off the table for most adult golfers. At 8.5–9 ft, a careful measurement at the hitting position may reveal workable clearance — or may reveal a duct that blocks a 3-inch section of the swing arc.

Before ruling out a basement, remove any drop ceiling tiles at the intended hitting position and measure to the actual joists. Unfinished basements often have more headroom than assumed. Some builders have gained 4–6 inches of effective clearance this way.
A camera-based launch monitor is almost always the correct choice for basements because the limited depth does not interfere with photometric tracking, and the reduced need for behind-golfer space works well in rooms where depth may also be constrained.
Single-Car Garage
A single-car garage typically measures 11–12 ft wide, 20–22 ft deep, with 8–9 ft ceilings. Width is the primary constraint. At 11–12 ft wide, hitting from the center of the screen is difficult; an offset position biased toward one side is usually required. Left- and right-handed players cannot typically share the same hitting position without moving the mat. A camera-based launch monitor is again the right choice for the reduced width, since radar units benefit from center-positioned setups for accurate off-axis shot tracking.
Spare Bedroom or Dedicated Room
Spare rooms offer climate control, privacy, and the cleanest installation aesthetics — but depth is typically the binding constraint. Standard bedroom dimensions of 12 × 12 ft or 12 × 15 ft leave very little depth after the screen buffer, hitting mat, and behind-golfer clearance are accounted for. A photometric (camera-based) launch monitor is mandatory in a room with under 16 ft of depth. Width is often adequate at 12+ ft, and ceiling height in newer construction frequently hits 9 ft or better.
What If Your Space Falls Short?
A room that does not meet the standard minimums is not automatically disqualified. These are the adjustments that make tight spaces workable:
Ceiling too low for driver: Switch to a shorter club set for simulator sessions. A 43–44 inch driver (versus the standard 45–46 inch) measurably reduces the swing arc's peak height without dramatically changing your swing. Practicing irons and wedges — which have shorter shafts and flatter swing planes — is a fully valid simulator use case for tight ceilings.
Room too shallow for radar: Switch to a camera-based launch monitor. The SkyTrak+, Bushnell Launch Pro, and Foresight GC3 are all designed to work in rooms as short as 14 ft. The data quality from a camera unit in a 14 ft room is meaningfully better than radar data from an undersized space.
Room too narrow for center hitting: Use an offset hitting position. The launch monitor and screen are positioned slightly to one side, allowing the golfer to swing freely without the follow-through reaching the near wall. Most launch monitors support offset positioning configurations. The tradeoff is that the field of view on the screen is slightly off-center from the golfer's natural sightline.
Basement with low ceiling at hitting position but higher elsewhere: Consider a slight depression in the hitting area. Some basement builders have cut a 3–4 inch depression under the hitting mat area to gain effective ceiling clearance — a structural project, but one that solves the problem permanently.
For a full room planning walkthrough before you purchase any hardware, see our home simulator room setup guide and our simulator room dimensions and planning guide.
Space Requirements by Launch Monitor Type
The table below summarizes the space impact of the most popular launch monitors for home use:
Launch Monitor | Type | Min. Depth Needed | Behind-Golfer Clearance | Notes |
|---|---|---|---|---|
SkyTrak+ / ST MAX | Camera + Radar | 14 ft | None | Sits beside ball; most space-efficient |
Bushnell Launch Pro | Camera + IR | 14 ft | None | Sits in front/side of ball |
Foresight GC3 | Camera | 14 ft | None | Side of ball; flexible position |
Garmin R10 / R50 | Radar | 16–18 ft | 6–8 ft | Floor mount behind ball |
FlightScope Mevo Gen2 | Radar | 16–18 ft | 7–9 ft | Behind ball; needs flight distance |
Uneekor EYE MINI | Overhead Camera | 14 ft | None | Ceiling mount; requires 9.5 ft+ ceiling |
ProTee VX | Overhead Camera | 14 ft | None | Ceiling mount; requires 9.5–10 ft+ ceiling |
For a detailed comparison of these monitors across accuracy, pricing, and simulation compatibility, see our golf launch monitor buying guide.
Projector Placement and Screen Distance
Room depth does not just affect your launch monitor — it also determines where your projector can go and how large an image it can produce. Most homeowners discover this constraint after buying a projector, which is the wrong order.
Every projector has a throw ratio — the relationship between the projector's distance from the screen and the image width it produces. A projector with a throw ratio of 0.8:1 produces an 8 ft wide image from 6.4 ft away. A standard (long-throw) projector with a 1.5:1 ratio needs 12 ft to produce the same 8 ft image.
In a 16 ft deep room with 10 ft of depth consumed by the hitting area and screen buffer, you have 6 ft remaining for projector placement. That requires a short-throw projector (throw ratio under 1.0) or mounting the projector above and behind the golfer. Short-throw projectors are more expensive but are the correct solution for tight rooms. Overhead mounting eliminates shadowing from the golfer's body and is the preferred approach for most dedicated simulator bays.
Key measurements to confirm before purchasing any projector:
Distance from your intended projector mounting position to the screen face
The screen's usable projection width (not the frame width)
The projector's throw ratio at your desired image size
Use the projector manufacturer's online throw calculator to confirm the match before ordering. A mismatched projector in a finished room is an expensive problem to solve retroactively.
Common Measurement Mistakes to Avoid
Measuring at the room's tallest point, not the hitting position. The 9 ft you measured at the center of the garage is irrelevant if the garage door track at the hitting position is at 8'4".
Not accounting for the hitting mat's thickness. A 1.5-inch thick hitting mat effectively raises the golfer's standing position by 1.5 inches relative to the floor measurement. In a tight ceiling situation, this matters.
Forgetting the screen buffer. The screen cannot sit against the wall. Allow 12–18 inches between the screen surface and the back wall, and subtract this from your usable ball-to-screen depth.
Planning for best-case swings. Design the space around your worst shot — a full-speed heel shank on a driver — not your average 7-iron. Side clearance should be adequate even when the ball goes nowhere near where you intended.
Ignoring climate for garage setups. A simulator that works well in October but is unusable from December to March is not a year-round setup. Factor climate control into your planning and your budget from the beginning.
Assuming the garage door track is out of the way. Take a full driver backswing from your intended hitting position and have someone check whether the club path comes within 12 inches of the track. If it does, you need to move the hitting position or modify the track mounting.
For more on how space planning connects to your overall equipment decisions, see our complete home golf simulator buying guide and our best launch monitors under $1,000 guide for budget builds in tight spaces.
The HomeGolfSetup editorial team has consulted on and reviewed dozens of real home simulator builds across garage, basement, and dedicated room configurations. All dimension recommendations reflect real-world outcomes, not theoretical minimums. This article may contain affiliate links. Your purchase price is not affected.
Frequently asked questions
Independent golf equipment reviewer. Tests every product in real home conditions before publishing a verdict. No paid placements.
Related guides
Affiliate disclosure: We earn a small commission if you buy through our links — this never influences our scores or recommendations. Learn more


