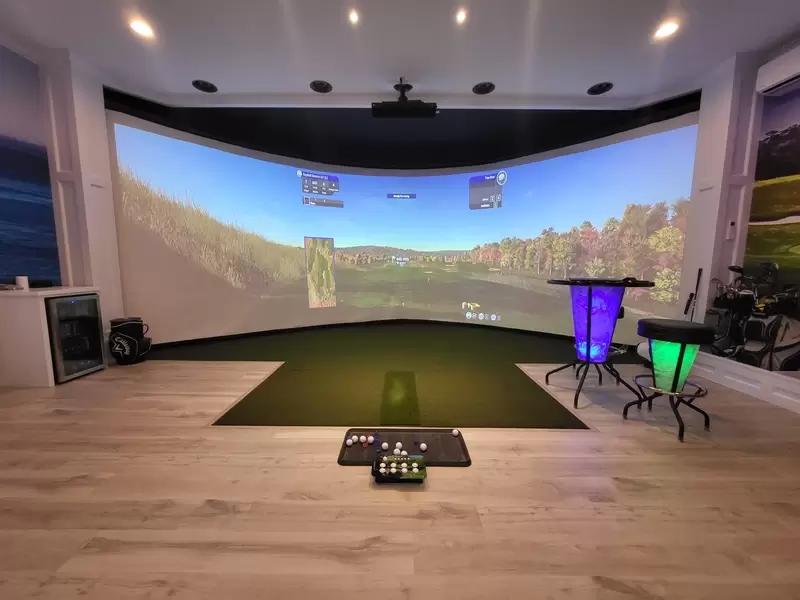
Building your own golf simulator is one of the most satisfying DIY projects a golfer can tackle — and one of the most cost-effective ways to get a quality setup. Done right, a custom DIY build delivers the same or better results than a pre-packaged system at 20–40% less cost, with the added benefit of being sized exactly to your space and specced exactly to your priorities.

This guide walks through every stage of the process: planning your room, choosing the right components, building the enclosure, configuring your software, and calibrating the full system for accurate, reliable use. No prior construction experience is required — the hardest skills involved are drilling into joists and running cable management. Everything else is assembly, measurement, and patience.
What a DIY Build Gets You (vs. Buying a Package)
Pre-packaged simulator systems are convenient, but you pay a bundling premium — typically 20–35% above what the same components cost sourced individually. More importantly, packages are built around standard room sizes and standard setups. If your garage ceiling is 11 feet, your room is 14 feet wide, or you want a specific launch monitor that doesn't come in any retail bundle, a DIY build is the only way to get exactly what you want.
The trade-offs are real too. A DIY build requires more upfront research, more time, and the willingness to troubleshoot when components don't immediately play well together. Budget a full weekend for the physical build, plus additional time for software setup and calibration.
For a full overview of what each component does and how the pieces fit together before you start buying, the complete 2026 home golf simulator buyer's guide is a useful starting reference.
Step 1: Plan Your Space

Everything starts with your room. Measure before you buy anything — building around the wrong dimensions is the most common and most expensive DIY mistake.
Minimum Dimensions
Measurement | Absolute Minimum | Recommended |
|---|---|---|
Ceiling height | 9 ft (2.7 m) | 10–12 ft (3–3.7 m) |
Width | 10 ft (3 m) | 14–16 ft (4.3–4.9 m) |
Depth (total room) | 12 ft (3.7 m) | 16–20 ft (4.9–6 m) |
Ball-flight distance (hitting position to screen) | 7 ft (2.1 m) | 10–14 ft (3–4.3 m) |
Ceiling height is the hardest constraint to work around. A full iron swing peaks at approximately 8.5 feet at the apex. Below 9 feet, you risk striking the ceiling — not just uncomfortable, but genuinely dangerous. If your space is 8.5 feet or under, reconsider the room before going further.
Width affects safety more than you think. Mark your hitting position on the floor, then stand in your address position and take a full practice swing. Note where the club travels at its widest point in both directions — this is your true swing width. Add at least 2 feet of clearance on each side. Any wall, column, or obstacle within that zone is a hazard.
Depth determines launch monitor performance. Most radar-based launch monitors perform optimally when positioned 5–8 feet behind the ball, with at least 7 feet of ball flight before impact with the screen. The further the ball travels before hitting the screen, the more data the sensor captures. Tight rooms force compromise here.
Common DIY Room Choices
Garage: The most popular choice by far, and for good reason. A standard two-car garage (20 × 20 ft) has more than enough footprint and ceiling height for an excellent build. Challenges: temperature extremes, condensation on cold concrete, and the need for insulation if you plan to use the space year-round.
Basement: Excellent natural temperature stability and concrete floors that anchor hitting mats firmly. The limiting factor is almost always ceiling height — standard basement ceiling-to-floor height of 8–8.5 ft is too low for most golfers. Check your exact measurements before assuming a basement will work.
Spare room or bonus room: Often the most finished option, with existing drywall, flooring, and climate control. The trade-off is usually ceiling height and impact-screen mounting constraints. Structural screws into joists are essential; drywall anchors alone will not hold an impact screen under repeated ball strikes.
Room Prep Checklist
Before ordering any components, work through this list:
[ ] Ceiling height confirmed at hitting position (not just center of room)
[ ] Swing width marked and clearance confirmed on both sides
[ ] Joist locations mapped (for screen and projector mounting)
[ ] Electrical outlets within reach of all powered components (or plan for extension management)
[ ] Ambient light sources identified (windows, skylights) — plan blackout treatment
[ ] Climate control assessed — will the room be comfortable year-round?
[ ] Floor surface evaluated — is underlayment or rubber matting needed?
Step 2: Choose Your Components
A DIY simulator has six core components. Each decision affects the others, so work through them in order.
Component 1: Launch Monitor
Your launch monitor is the most important purchasing decision in the build. Everything else supports it.

Under $1,000 — Garmin Approach R10 ($600) The R10 is the best entry-level DIY anchor. Doppler radar tracking, 16 data parameters, compatible with GSPro and E6 Connect. Positioned 7–8 feet behind the ball. Best for beginners and first-time builders who want to validate the habit before spending more.
$1,000–$3,500 — Mevo+ Pro Package ($2,999) / SkyTrak+ ($2,995) This is the serious DIY sweet spot. The Mevo+ uses multi-radar technology and is particularly strong outdoors and in rooms with adequate depth. The SkyTrak+ uses a hybrid radar-camera sensor with superior indoor spin consistency. Both connect to multiple simulation platforms. Choose the Mevo+ if you also play outdoors; choose the SkyTrak+ if the build is primarily an indoor practice setup.
$4,000–$8,000 — Foresight GC3 ($6,995) / Uneekor QED ($5,995) At this level, tracking accuracy approaches tour-fitting standards. The GC3 is a floor-positioned photometric unit; the QED mounts overhead and captures club data without a subscription add-on. Both are excellent long-term investments that won't need replacing.
Placement note: Floor-based units (R10, Mevo+, SkyTrak+, GC3) sit on a small platform or mount behind the hitting mat, typically 2–3 feet to the side and slightly behind the ball. Overhead units (QED, Uneekor EYE XO) require a ceiling or bar mount directly above the hitting zone — factor this into your enclosure design.
Component 2: Impact Screen
The impact screen is the surface your ball hits after the shot. It is also your projection surface. Don't underestimate this component — a cheap screen that billows, tears, or transfers impact force poorly will frustrate every session regardless of how good your launch monitor is.

What to look for:
Multi-ply polyester construction with a woven mesh backing — single-ply screens tear within months of regular use
3mm or thicker material for adequate shot absorption
Matte finish for uniform projection without hotspots
Grommets on all four sides for tensioning — a slack screen distorts the projected image and increases wear
Recommended screen sizes:
Room width | Screen width | Screen height |
|---|---|---|
10–12 ft | 8 ft | 5 ft |
12–14 ft | 10 ft | 7 ft |
14 ft+ | 12 ft | 8–9 ft |
Trusted DIY screen sources: Carl's Place, Rain or Shine Golf, and The Net Return all offer quality impact screens in the $300–$900 range depending on size and material grade. Carl's Place also sells DIY screen material by the yard if you want to build a custom-sized screen — an excellent option for non-standard room dimensions.
Component 3: Enclosure Frame
The enclosure frame holds your impact screen, side barriers, and overhead bar in a freestanding structure. It defines the boundaries of your simulator bay and keeps errant shots contained.
Option A: Pre-built enclosure kits Carl's Place and Rain or Shine Golf offer modular aluminum or steel tube frame kits in standard sizes (10 × 10, 12 × 10, 15 × 10 ft face dimensions). These assemble in 3–5 hours without cutting or welding, using pre-drilled components and connectors. Cost: $800–$2,500 depending on size and material.
Option B: Build your own frame from lumber or steel conduit A 2×4 lumber frame is the most DIY-accessible approach. Using standard construction lumber available at any hardware store, you can build a custom-sized enclosure frame for $150–$400 in materials. The trade-off is weight and permanence — a lumber frame is harder to disassemble than an aluminum kit if you move or reconfigure.
Option C: Wall-mount the screen directly In finished rooms with accessible joists, the screen can be mounted directly to the wall using a track-and-grommet tensioning system. This eliminates the need for a freestanding frame entirely, saves cost, and produces the cleanest look. Requirements: drywall screws into studs, a level screen mount rail, and adequate wall surface area. Not suitable for rented spaces or rooms where wall penetration is unacceptable.
Side barriers: Regardless of your frame approach, always add side barrier netting. Heavy-duty nylon golf netting ($1–$3/sq ft) attached to the side edges of the enclosure contains off-center shots that miss the impact screen. Budget $100–$250 for side netting material.
Component 4: Projector

The projector displays the simulation software onto your impact screen. In a DIY build, projector selection depends on three variables: your throw distance (room depth), ambient light level, and budget.
Key specs to evaluate:
Throw ratio: A short-throw projector (0.4:1 to 0.8:1) produces a large image from a short distance — essential in rooms under 14 ft deep. Standard-throw projectors need more distance than most simulator rooms allow.
Lumens (brightness): Minimum 3,000 lumens for a room with controlled light. 4,000–5,000 lumens if any ambient light is present. Anything under 2,500 lumens will produce a washed-out image in anything other than a fully blacked-out room.
Resolution: 1080p is the practical minimum for a quality experience. 4K projectors are available from $1,500+ and produce a noticeably sharper image on screens 10 ft and wider.
Lamp vs. laser light source: Laser projectors cost more upfront ($1,200–$4,000 vs. $400–$800 for lamp-based) but eliminate bulb replacement cost ($200–$350 every 2,000–3,000 hours) and maintain consistent brightness over time. For heavy use, laser is the better long-term investment.
Mounting: The projector should be mounted overhead behind the hitting position, aimed at the screen. Use a ceiling mount bracket rated for the projector's weight, screwed into a joist — not into drywall alone. Position the projector so the image fills your screen without keystoning; most modern projectors include digital keystone correction, but optical alignment is always preferable.
Budget projector picks:
Under $600: BenQ TH671ST (1080p, lamp, 3,000 lumens) — capable entry-level short-throw
$800–$1,200: Optoma GT2000HDR (1080p, high brightness) — step up in color accuracy
$1,500–$2,500: BenQ LH600ST (1080p laser, 2,500 lumens) — laser reliability, low maintenance
$3,000+: Optoma ZH400ST (1080p laser, 4,000 lumens) — premium brightness and color
Component 5: Hitting Mat
Your hitting mat is the surface you stand on and strike the ball from. It needs to replicate the feel of real turf contact without the ground resistance of actual soil — a balance that cheap mats get badly wrong, producing a stiff, jarring impact that both damages your wrists and gives false feedback on strike quality.

What to look for:
Foam backing of at least 1 inch — thinner backing transmits concrete sub-floor impact directly through to your joints
Dual-density turf — a softer fairway section for full shots, a firmer section for chip and pitch practice
Replaceable hitting strip — the strike zone of any mat compresses and wears over time; mats with a replaceable insert extend the mat's lifespan significantly
Tee options: Side-mounted tee holders (which flex rather than breaking) are preferable to center-cut holes, which weaken the mat structure over time
Recommended sizes: A 5 × 5 ft mat is the minimum for comfortable use. A 5 × 10 ft mat gives you more room to vary your stance for different club types and is more comfortable for extended sessions.
Budget range: $150–$300 for a serviceable entry mat; $400–$800 for a premium option with dual density, foam backing, and replaceable inserts. The Fiberbuilt mats and Country Club Elite series are consistently well-regarded by the DIY community for durability at reasonable cost.
Component 6: Software
Your simulation software is the platform that renders courses, processes launch monitor data, and drives the practice and entertainment experience. Most launch monitors are compatible with 2–4 platforms; pick based on what matters most to you.
GSPro — Best for course variety and multiplayer. Community-developed platform with 200+ courses, active online matchmaking, and strong DIY community support. $150/year. Compatible with R10, Mevo+, SkyTrak+, and most major launch monitors.
E6 Connect — Best for visual quality and software polish. Used in commercial simulator installations worldwide. Course library is smaller (~100 courses) but individually rendered to a higher standard. $200/year for the standard tier; $400/year for the Pro tier with full course access.
Awesome Golf — The fastest-growing platform in 2025–2026. Clean interface, growing course library, and a video review feature that overlays swing footage with shot data automatically. $200/year.
The Golf Club 2019 (TGC2019) — Excellent legacy platform with a massive community-created course library (100,000+ designs). No active development but remains stable and widely supported. One-time purchase, no subscription.
Creative Golf 3D — Best for teaching and coaching environments. Practice modes, dispersion analysis, and lesson tools are more developed than on any other platform. $199/year.
Step 3: Build the Enclosure
With components chosen and delivered, the physical build begins. Plan for a full day with a helper — most of the work is two-person.
Tools You'll Need
Power drill with bits and screwdriver heads
Stud finder
Level (4 ft preferred)
Measuring tape
Ladder
Cable ties and cable management clips
Safety glasses
Build Sequence
1. Mark the layout on the floor. Use painter's tape to mark the full footprint of your enclosure on the floor. Include hitting position, screen position, and projector throw distance. Walk through a shadow swing at your hitting mark to confirm clearance before drilling anything.
2. Assemble the enclosure frame. If using a kit, follow manufacturer instructions — most aluminum frame systems clip together without tools. If building from lumber, assemble the frame flat on the floor first, then raise it into position. A 2×4 frame for a 10 × 10 ft screen face requires approximately:
4 vertical uprights (cut to ceiling height minus 2 inches)
2 horizontal top rails (10 ft)
2 horizontal base rails (10 ft)
Cross-bracing as needed for rigidity
3. Anchor the frame. A freestanding enclosure must be secured so it cannot tip forward under ball impact. Options: L-brackets to the floor (concrete anchor bolts if on slab), wall anchor at the top of the rear uprights, or sandbag ballast weights at the base. Never leave a frame unanchored.
4. Mount and tension the impact screen. Attach the screen to the frame using the grommet loops and bungee or rope tensioning cord. The screen should be taut but not stretched — some natural drape is acceptable and helps with shot absorption. A screen tensioned too tightly becomes rigid and risks tearing under repeated impact.
5. Hang side barrier netting. Attach netting panels to the side posts of the enclosure, extending from screen to the rear of the frame. The goal is to contain shots that miss the screen left or right. Secure with zip ties every 6–8 inches along the frame rail.
6. Install the projector mount. Locate the nearest ceiling joist behind your hitting position using a stud finder. Drill the ceiling mount bracket into the joist — minimum two screws, 3 inches in length. Hang the projector, connect the power and HDMI cable, and run cable management along the ceiling to your PC or console position.
7. Position the launch monitor. Floor-based units: set on a low platform or sensor mount 2–3 feet to the trail side of the hitting mat, angled toward the ball position. Overhead units: mount to the overhead bar or ceiling mount per manufacturer specifications. Most units require a brief calibration routine on first setup — follow the manufacturer's app guide.
8. Lay the hitting mat. Position the mat so the center strike zone aligns with your natural address position relative to the screen. On concrete, use non-slip mat grippers or double-sided tape to prevent the mat walking forward during use.
Step 4: Configure Software and Calibrate

The physical build is done. Now the system needs to be configured so data flows correctly and the simulation experience is accurate.
Software Installation
Install your chosen simulation platform on a dedicated PC or gaming laptop. For smooth performance at 1080p, you need at minimum: Intel i5 or AMD Ryzen 5 processor, 16 GB RAM, dedicated GPU (Nvidia GTX 1660 or better). 4K rendering requires a more capable GPU — RTX 3060 or better.
Connect your launch monitor to the PC via USB, Bluetooth, or WiFi depending on the unit. Most modern launch monitors use a companion app that links wirelessly to the simulation software.
In your simulation platform, navigate to the launch monitor settings and select your device. Run the platform's connection test to confirm data is flowing.
Launch Monitor Calibration
Each launch monitor has its own calibration process. Common universal steps:
Confirm position: Verify the device is at the manufacturer-specified distance and angle from the ball position. Even a few inches off-spec affects reading consistency.
Set handedness: Left or right-handed setting must match the player before each session on shared setups.
Run test shots: Hit 10–15 balls and compare readings to your known carry distances with a 7-iron and driver. If the simulator is producing numbers significantly outside your real-course distances, adjust position and re-test before assuming a hardware fault.
Projector Alignment
Fill the screen: Adjust the projector zoom and shift to fill the impact screen edge to edge with the projected image. Leave a 2–3 inch buffer at the screen edges so the course image doesn't extend beyond the screen onto the frame.
Correct keystone: Use the projector's digital keystone correction or, preferably, physically adjust the tilt angle of the projector mount for optical alignment. Digital keystone correction degrades image sharpness slightly.
Confirm brightness: In your normal room lighting conditions, check that the image is clearly legible across the full screen. Adjust projector brightness settings if washed out; close blackout shades if ambient light is the issue.
Step 5: Optimize the Room
A well-built simulator in a poorly optimized room underperforms. These finishing steps make a significant difference.
Lighting
Install dimmable LED panel lighting positioned to illuminate the hitting area without creating glare on the screen. Avoid placing lights directly in front of the screen. Warm-temperature LEDs (2700–3000K) are easier on the eyes during extended sessions than cool white.
Blackout Treatment
Any natural light source — windows, skylights, gaps in garage doors — will degrade projector image quality. Blackout curtains or foam blackout panels are inexpensive ($30–$100 per window) and make a visible difference. This is the highest-return low-cost improvement in any simulator room.
Sound
A quality speaker or soundbar connected to your simulation PC dramatically improves immersion. Golf simulation software includes ambient course sounds, crowd noise, and shot audio — these details are often overlooked but contribute meaningfully to the experience of extended sessions.
Climate Control
A garage or basement simulator room that's unusable in winter or summer has obvious limitations. A mini-split HVAC unit ($600–$1,500 installed for a single-zone system) solves both heating and cooling and pays for itself quickly in year-round usability. At minimum, a portable heater for winter use keeps the room functional.
Flooring
If your room has a concrete slab floor, add rubber underlayment or interlocking foam tiles outside the hitting mat area. Standing on concrete for a 90-minute session is fatiguing in a way that rubber flooring eliminates. Full-room rubber matting (3/8-inch thickness) costs $1–$2 per square foot — for a 15 × 15 ft space, that's $225–$450 well spent.
Total DIY Build Cost Summary
Build Tier | Launch Monitor | Full Build Cost | Annual Software |
|---|---|---|---|
Budget DIY | Garmin R10 ($600) | $2,000 – $3,500 | $150 – $200 |
Mid DIY | SkyTrak+ / Mevo+ ($2,995) | $6,000 – $9,000 | $200 – $400 |
Premium DIY | GC3 / Uneekor QED ($5,995–$6,995) | $10,000 – $15,000 | $400 – $800 |
vs. equivalent pre-packaged systems: In our comparison, a DIY mid-range build typically runs 20–30% less than a comparable pre-packaged system from a major retailer — while delivering better component-level quality in each category, since you're not subsidizing bundle margins.
For a detailed breakdown of what each of these tiers costs when buying pre-packaged systems, our golf simulator cost guide breaks down real prices across all four tiers.
Common DIY Mistakes to Avoid
Skipping the stud finder on projector mounts. Drywall anchors will not hold a projector over time. Screws into joists are the only safe mounting method — every time.
Buying the cheapest impact screen available. A $90 screen from an unverified supplier tears within weeks of regular use. The screen takes a ball at 100+ mph hundreds of times per session. Buy from a known supplier with a material specification.
Positioning the launch monitor too close to the screen. Most launch monitors need a minimum distance from both the ball and the screen for accurate tracking. Check your specific unit's spec sheet for minimum ball-to-screen depth requirements.
Neglecting cable management. A simulator bay with power cables and HDMI runs across the floor is a tripping hazard and looks amateurish. Run cables along ceiling edges and walls using cable raceways — they cost almost nothing and make a dramatic difference to the finished look.
Not testing before finishing the room. Always run a full session — lights, software, launch monitor, everything — before any finishing work like flooring or wall trim. Discovering a projector alignment issue or launch monitor calibration problem before the room is finished saves significant rework.
All build specifications and pricing in this guide reflect current availability as of May 2026. Component pricing changes regularly — verify current prices with suppliers before beginning your build.
Frequently asked questions
Independent golf equipment reviewer. Tests every product in real home conditions before publishing a verdict. No paid placements.
Related guides
Affiliate disclosure: We earn a small commission if you buy through our links — this never influences our scores or recommendations. Learn more


